How to Activate Your Child’s Palatal Expander: A Step-by-Step Guide
As a parent, you want to ensure your child’s dental health is in the best possible condition. One common orthodontic device used to correct issues such as crowding, cross-bites, or narrow upper jaws is the palatal expander. While your orthodontist will provide detailed instructions, here’s a comprehensive guide to help you feel confident about activating your child’s palatal expander at home.
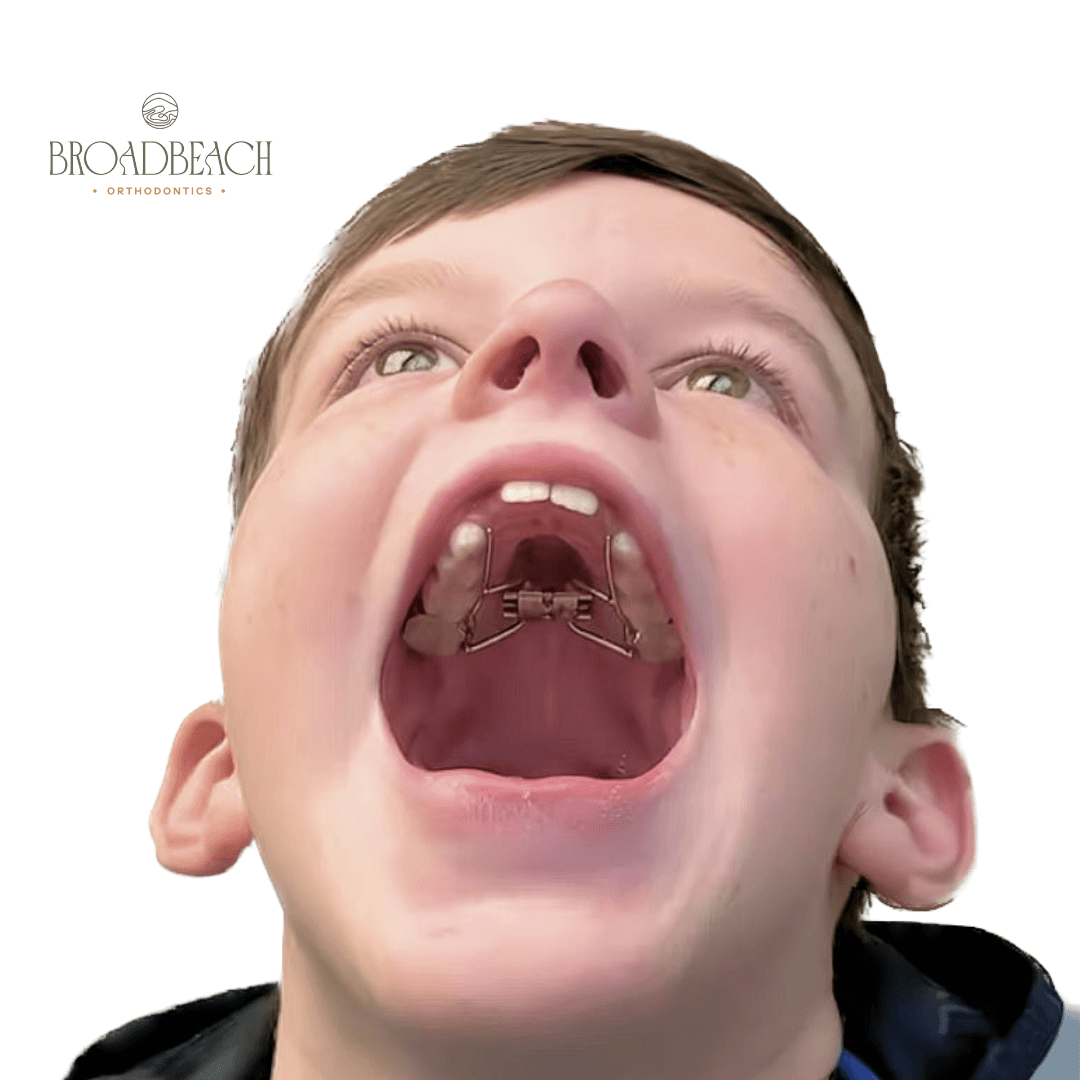
What is a Palatal Expander?
A palatal expander is a device used to widen the upper jaw so that the teeth can fit together better. It’s most commonly used in children and adolescents, as their bones are still growing and more easily adjustable. The device is attached to the upper molars with bands or other types of orthodontic appliances.
Understanding the Activation Process
The activation process involves turning a key in the expander to apply gentle pressure on the upper jaw, encouraging it to widen over time. Here’s a step-by-step guide to ensure you perform this task correctly.
Materials You’ll Need
Palatal expander key (provided by your orthodontist)
Good lighting
A mirror (optional, but helpful)
A comfortable chair for your child
Step-by-Step Activation Guide
Step 1: Preparation
Wash your hands: Always start with clean hands to avoid introducing any bacteria into your child’s mouth.
Set up a well-lit area: Ensure you have good lighting to see clearly inside your child’s mouth. You may find a headlamp or a flashlight helpful.
Get your child comfortable: Have your child sit in a comfortable chair with their head tilted back. A reclining chair can work well.
Step 2: Locate the Keyhole
Examine the expander: Familiarise yourself with the expander’s design. Locate the small hole or slot in the middle of the expander, which is where the key will be inserted.
Practice: Before actually turning the key, practice inserting it into the hole so you’re confident in your ability to find it easily.
Step 3: Insert the Key
Hold the key correctly: The key should have a handle and a thin wire that fits into the hole of the expander.
Insert the key: Gently place the key into the hole in the expander. It should slide in without too much force.
Step 4: Turn the Key
Firm and steady turn: Once the key is inserted, apply gentle, steady pressure to turn it in the direction indicated by the arrow on the expander plate and as instructed by your orthodontist (usually towards the back of the mouth).
Full rotation: Ensure you complete a full turn until the next hole appears. This ensures the expander is activated correctly.
Step 5: Remove the Key
Carefully withdraw the key: Gently remove the key from the hole. Be sure not to backtrack or undo the turn you’ve just made.
Check for comfort: Ask your child if they feel any discomfort. Some pressure is normal, but it should not be painful.
After Activation Care
Monitor for discomfort: Your child may feel some pressure or minor discomfort after activation. Over-the-counter pain relief, such as acetaminophen or ibuprofen, can help if needed.
Oral hygiene: Ensure your child maintains good oral hygiene, brushing around the expander carefully to prevent food particles from getting trapped.
Regular check-ups: Keep all follow-up appointments with your orthodontist to monitor progress and make any necessary adjustments.
Tips for Success
Consistency: Follow the schedule provided by your orthodontist for activations. Consistency is key to achieving the desired results.
Positive reinforcement: Encourage your child by explaining the benefits of the expander and offering positive reinforcement for their cooperation.
Communication: Keep an open line of communication with your orthodontist. If you encounter any issues or have questions, don’t hesitate to reach out.
Conclusion
Activating your child’s palatal expander may seem daunting at first, but with practice, it becomes a straightforward process. By following these steps and maintaining open communication with your orthodontist, you can help ensure the treatment is successful and your child achieves a healthy, beautiful smile.
Remember, every child’s situation is unique, so always defer to the specific instructions provided by your orthodontist tailored to your child’s needs.

“Girl Math” in Orthodontics: Making Sense of Metal Braces
Recommended For You

Happy Easter from Broadbeach Orthodontics: Tips to Avoid Breakages
Easter is a time to relax, celebrate with family, and enjoy a few treats. At Broadbeach Orthodontics, we…
Smile Transformation at Broadbeach Orthodontics
Another great result from the team at Broadbeach Orthodontics. This case shows the impact of comprehensive orthodontic treatment…
Underbite in kids: Why Timing Matters for Growing Smiles
When it comes to orthodontics, timing can play a critical role—especially for children with a Class III malocclusion…